You can find the CI setup for the WTFramework here,
https://travis-ci.org/wiredrive/wtframework
and the build plans here,
https://github.com/wiredrive/wtframework/blob/develop/.travis.yml

I'll outlined the steps I took to setting up a simple CI process using Travis-CI and SauceLabs to run tests upon code check in to GitHub. The WTF project is running a blend of unit tests, and a few selenium tests where the tests interact with the web browser.
Step 1 : Make your open source project publicly available on GitHub
For this article I'll be using github. Since Travis-CI integrates deeply with GitHub, you'll want to host your project on GitHub if you want to use Travis-CI. Also, SauceLabs' open source account will require a public repo in order to qualify for the account.I'd recommend setting up at least 2 branches using the git-flow model .
- A 'master' branch that'll track your public releases.
- A 'develop' branch to use as your main integration point.
You can use other branching models. But this is what I feel works best with this work flow since it has a clear procedure to the direction of your merges.
Step 2 : Sign up for a SauceLabs open source account
As of this writing, SauceLabs, offers a free account for open source projects (with limited concurrent instances). This is great for open source projects needing to run Selenium tests.https://saucelabs.com/opensource
This process can take a few days to complete as there is a review process SauceLabs does before creating your open source account. Once you get your account, spend some time getting to know SauceLabs if you haven't already.
Step 3 : Figure out how to run your tests using the command line on a unix system
The first step is figuring out how to setup your test environment from a fresh Travis-CI node. I'd recommend going to the Travis website, then looking at the guide for your specific language as a starting point.http://about.travis-ci.org/docs/user/ci-environment/
You'll want to take the approach of figuring out what travis has out of the box for that particular language, then figuring a managed way of deploying your dependencies. Since WTF is a python project, using 'pip' and 'requirements.txt' file was a natural choice.
Here's sort of the basic commands for running WTF unit tests from the command line:
These will used to build our travis config file for which commands to run during install and execution.echo "setting up test environment" pip install -r requirements.txt --use-mirrors echo "setup environment variable for selenium grid in environment variable" export WTF_selenium_remote_url=http://sauceuser@yoursecretapikey:@ondemand.saucelabs.com:80/wd/hub echo "running unit tests" nosetests wtframework/wtf/tests/ nosetests wtframework/wtf/data/tests/ nosetests wtframework/wtf/testobjects/tests/ nosetests wtframework/wtf/utils/tests/ echo "running selenium tests" nosetests wtframework/wtf/web/tests/
Step 4 : Setup your tests to pull the SauceLabs settings from Environment Variables
Note that secret configuration variables are passed via an environment variable. You'll want to refactor your tests to read settings form an environment variable if they are sensitive, because you'll be passing them in encrypted instead of putting it inside your build or config files. In this case, I'm passing the SauceLab's grid URL with the secret API key through the environment variable.
In the WTF framework, we do have a convenient way of referencing config variables. But in absence of a config layer, you can just replace all your creation of Selenium Webdriver with:
caps = webdriver.DesiredCapabilities.FIREFOXcaps['platform'] = "Windows 8"caps['version'] = "10"selenium_grid_url = os.getenv('selenium_remote_url)driver = webdriver.Remote(desired_capabilities = desired_capabilities,command_executor = selenium_grid_url)
Step 5 : Setup a Travis-CI project
Goto http://travis-ci.org, then login with your GitHub account. Click on your profile picture to open your Travis-CI profile. Then find your GitHub project and switch it to the 'ON' position to enable it.
Next, you'll want to create a '.travis.yaml' file. Go back and read the Travic-CI guides to find how to configure your '.travis.yaml' file.
http://about.travis-ci.org/docs/user/build-configuration/
You'll have a '.travis.yaml' file like below:
---
# Put the command line commands you'll be running for your test.
# Here I have a simple nosetest2 unittest excluding tests I've tagged
# not to run on CI.
script:
- nosetests-2.7 wtframework/wtf/tests/ -a !noci
- nosetests-2.7 wtframework/wtf/data/tests/ -a !noci
- nosetests-2.7 wtframework/wtf/testobjects/tests/ -a !noci
- nosetests-2.7 wtframework/wtf/utils/tests/ -a !noci
- nosetests-2.7 wtframework/wtf/web/tests/ -a !noci

# Set your language
language: python
python:
- "2.7"
# Set your command for managing dependencies
install: pip install -r requirements.txt --use-mirrors


# Set your environment variables, like the sauce labs config.
env:  selenium_remote_url=http://sauceuser@yoursecretapikey:@ondemand.saucelabs.com:80/wd/hub
Make sure for any secret value you want to pass to travis (api keys, passwords, etc.), you'll need to rework your project to read them from an environment variable. They will be temporarily out in the open while you troubleshoot your script, we'll revoke, generate new ones, and encrypt them later after we get the project working.
After you added the '.travis.yaml' file to your project's root folder. Push it to GitHub. After you push your changes, Travis-CI will queue your project to be run. When it starts running, you can visit your project page at on travis, https://travis-ci.org/githubaccount/projectname, and you'll see a yellow ball indicate it's running, and the shell output below.

While you're tests are running, log in to the SauceLabs Account, and see check if your tests run. Under tests, you'll see some automated testing sessions spawned up. You can also view a video stream of the selenium node, and a video recording after the test has completed.

Step 6 : Encrypt your Environment Variables
Now that you have your project fully running. The last step is to hide all your sensitive information you've extracted out into the environment variables, like the SauceLabs api key, and any other api keys or passwords you have created. Travis on instructions on how to do this here,http://about.travis-ci.org/docs/user/encryption-keys/
You'll want to first have Ruby installed if you haven't already. Best way to install Ruby is to use RVM (Ruby Version Manager), https://rvm.io/
After you have ruby install you can install the travis gem.
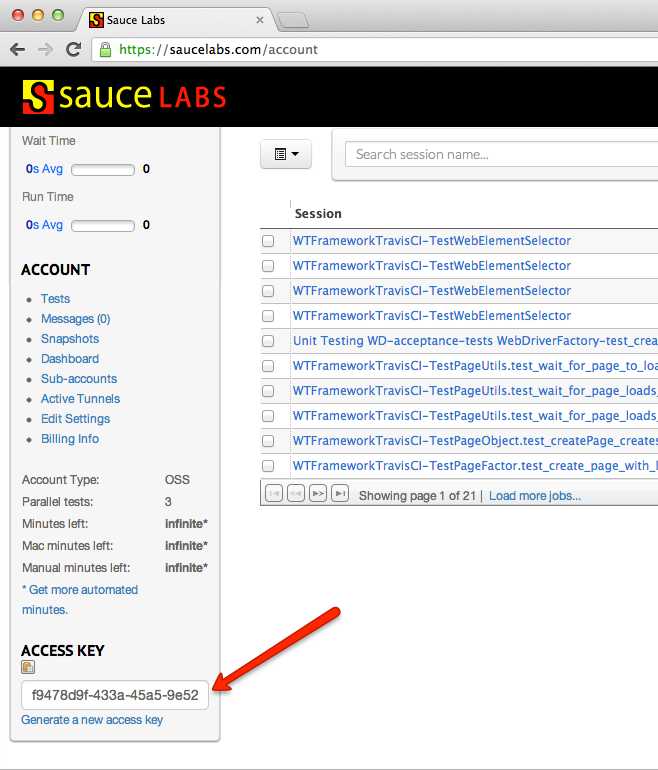
After the Travis' Ruby Gem is installed. You can start encrypting your keys. First revoke your old keys and change the passwords used. In SauceLabs, you can find this functionality at the bottom left of your account homepage.bash-3.2$ sudo gem install travis Successfully installed travis-1.2.3 1 gem installed Installing ri documentation for travis-1.2.3... Installing RDoc documentation for travis-1.2.3... bash-3.2$
With your new API key generated, we can now encrypt it. You can do this using the 'travis encrypt' command, with the '--add' flag to automatically insert it into your travis config. You can also exclude the '--add' flag if you want to view the encrypted output and manually insert it yourself.
Go back and edit your ".travis.yaml" file. Remove your old keys that you've replaced with a secure one. Your config file should now look similar to below. Note the old 'env:' section is not replaced by 'secure' globals with encrypted values.bash-3.2$ travis encrypt WTF_selenium_remote_url=your_secret_sauce_api_key --add /Library/Ruby/Gems/1.8/gems/faraday-0.8.7/lib/faraday/adapter/net_http.rb:23: warning: already initialized constant NET_HTTP_EXCEPTIONS bash-3.2$
install: pip install -r requirements.txt --use-mirrors
env:
  global:
    secure: |-
      azb2aXWuGWsymxeXGkUER@4*SQ58kJ+bx1MamEYYf5XcoDyW2R8fn/8q1H
      JcPK/EB0F8gBrvthE/f@dWNQmV0yHmiTkAbF6tPMC2XCW5HlH38raFZ6eCE
      hyLNfQpF+MEKTXPs+mcptF/1y3KuUGjPu60dgfyDxCzro+FKPpw=
python:
- "2.7"
language: python
script:
- nosetests-2.7 wtframework/wtf/tests/ -a !noci
- nosetests-2.7 wtframework/wtf/data/tests/ -a !noci
- nosetests-2.7 wtframework/wtf/testobjects/tests/ -a !noci
- nosetests-2.7 wtframework/wtf/utils/tests/ -a !noci
- nosetests-2.7 wtframework/wtf/web/tests/ -a !noci
At this point, all you have to do is push your changes and watch it run again to verify you have things working.
No comments:
Post a Comment