Showing posts with label Selenium. Show all posts

Tuesday, December 3, 2013

Quick and dirty way of dealing with hover over links that works across systems.

I haven't posted in a while.  Thought I'd can post some code snippets here and there of things I ran into.

In a recent project, I had to deal with links that appear only when you hover over and area.  For example, hovering over a movie to display a pause button like in Hulu's movie player.

One problem is the ActionChains does not consistently work across all systems.  Most notably Macs and on PhantomJS.  

To get around it, I used a bit of JavaScript magic to set the element visible.

    def __force_link_visible_and_click(self, link_element):
        ActionChains(self.webdriver).move_to_element_with_offset(link_element, 1, 1).perform()
        commands = [
            "arguments[0].style.opacity = 1;", # For modern browsers
            "arguments[0].style.filter = \"alpha(opacity=100)\";" # For IE10 and earlier
        ]
        for command in commands:
            try:
                # Execute both JS commands.
                self.webdriver.execute_script(command, link_element)
            except:
                pass

        # Wait a second to allow link to become visible before clicking.
        link_element.click()

Wednesday, August 21, 2013

Ways of dealing with StaleElementReferenceException in Selenium Webdriver

Lately I've been spending a lot of time debugging a bunch of flaky tests.  A while back I wrote a bunch of tests that were executing fine locally, but since moving it to a 3rd party grid, and running it across a larger range of browsers, I've find my self dealing with many flakiness issues, including 
StaleElementReferenceException.

What causes them?

In short, a StaleElementException is calling a reference on an element that has been torn down.  There are many causes for them, here are some of the common ones I've seen.

  • Page Refresh - I've seen this commonly working with tabbed pages.  Sometimes a page will look like 1 page with multiple tabs, but really are completely separate pages.  It might look like the same tab bar, but in reality you'll have to re-find the element in order to work with it.
  • JavaScript MVC frameworks - Many JavaScript MVC frameworks can update contents of a list or a control by rapidly tearing down and recreating the same element.  There are times an element looks like only the text is updating, but in reality the entire element is torn down and rebuilt.
  • Elements in transition - An interesting trick web developers use to create interesting transitions is to clone an section or div (and everything inside), then manipulate the clone that's overlaid on top the actual elements.  For example, to make a simple slide in transition to appear as if the old contents were sliding out and the new contents are sliding in, you could create a clone or the contents, then animate that clone to slide out while the new contents are in an identical div that's sliding in.
  • Elements being moved or reordered - If an element disappears off the screen to be relocated, it'll cause the original reference to go stale.
  • Elements being re-rendered - A good example is an ajax request that dumps it's return into the page.


Strategies to dealing with them

Here are some strategies I've used for dealing with some of the causes of StaleElementExceptions.  For the purpose of this article, I'll use Python since that's the language I'm currently using.

Note: In many of the examples, you'll see a 'wait_until()' method.  This method is just a simple wrapper function I created that executes a given statement until it returns true. You can find the source code for it here, https://github.com/wiredrive/wtframework/blob/master/wtframework/wtf/utils/wait_utils.py

Storing locators to your elements instead of references

This does not always work, but it'll reduce StaleElementExceptions by always performing a new find operation before each call to the WebElement.  It reduces staleness, but does add a bit of CPU and bandwidth usage to the overall test.  It is however very easy to do and work with.
from selenium import webdriver
import time
import unittest

class Test(unittest.TestCase):

    def testName(self):

        driver = webdriver.Firefox()
        driver.get("http://www.github.com")
        search_input = driver.find_element_by_name('q')
        search_input.send_keys('hello world\n') # Page contents refresh after typing in search results.
        time.sleep(5)
        search_input.send_keys('hello frank\n') # StaleElementReferenceException
But by storing the locator function instead of the reference to the element itself, we can avoid this.
from selenium import webdriver
import time
import unittest


class Test(unittest.TestCase):

    def testName(self):
        driver = webdriver.Firefox()
        driver.get("http://www.github.com")
        search_input = lambda: driver.find_element_by_name('q')
        search_input().send_keys('hello world\n') 
        time.sleep(5)
        search_input().send_keys('hello frank\n') # no stale element exception

This is because calling 'search_input()' re-evaluates the lambda statement and does a find on the element again.  This prevents staleness by getting a fresh reference to the WebElement each time.  

This technique is good for elements that get refreshed after an action, but don't necessarily change.  Like a 'Save' button that gets redrawn when a new entry is loaded, but has the same recognition properties.

Leverage hooks in the JS libraries used

Various frameworks and libraries will have different hooks that let you poll the state.  For example Jquery, has an animation queue, http://api.jquery.com/queue/,  you can query to detect if any transition effects are still running on the WebElement.  Polling the animation queue is a good way to avoid staleness that's caused in transition effects, such as slide in/out, fades, moving panes, etc...

It's pretty simple to poll on the transition queue.  You first need to figure out the selector (in that particular library/framework) for the element, then execute a javascript polling loop on it.

        # Using Jquery queue to get animation queue length.
        animationQueueIs = """
        return $.queue( $("#%s")[0], "fx").length;
        """ % element_id
        wait_until(lambda: self.driver.execute_script(animationQueueIs)==0)


This technique is best for waiting on animations or transitions to complete.  Most common one I've used it for is to wait for a sliding div containing elements I want to verify to completely slide into view before continuing.

Proactively wait for the element to go stale

This strategy is good if you have a reference to the element you want to wait for already and know  you are performing an event that'll update that element.  You can use this for waiting for an Ajax request to respond.  For example, say you have an counter that counts entries, and a button that creates a new entry.  And you want to verify that the count is incremented when a new entry is created.  You can wait for the counter to go stale before re-finding the counter and verifying it.

def is_element_stale(webelement):
    """
    Checks if a webelement is stale.
    @param webelement: A selenium webdriver webelement
    """
    try:
        webelement.tag_name
    except StaleElementReferenceException:
        return True
    except:
        pass
    
    return False

...


old_link_reference = driver.find_element_by_xpath("//div[@id='linklist']")

self.next_button().click()

# Wait till the element goes stale, this means the list has updated
wait_until(lambda: is_element_stale(old_link_reference))

updated_link_reference = driver.find_element_by_xpath("//div[@id='linklist']/*[text()='mylink']")

What this does is it waits for the old reference link to go stale, meaning the list has been cleared out and updated, then attempts to select the new link.  This approach is good to use when searching for an entry in a paginated list.  This allows you to stop polling and paginate to the next page the moment the ajax request for the next page returns, instead of waiting for some fixed timeout period polling for the desired element.

Javascript Latching

Javascript latching is a good technique when you have access to the source code, and can build in some test hooks into the webpage.  How JavaScript latching works is you add a promise to a asyc call in your Page's javascript source.

 //----------------------------------------------------------
 // Notice JQuery ajax calls return Promise objects.
 //----------------------------------------------------------
 var request = $.get("http://somewhere.com", {params:'...'})
               .then(function() {
                   // code developer wrote to process response...
                   // ......
                }).always(function(){
                   //----------------------------------------
                   // Notice I just daisy chain my LATCH onto  
                   // this code when the action completes.
                   //----------------------------------------
                   console.log("LATCH SET");
                   window._AUTOMATION_LATCH = true;
                });

Then in your Selenium test code, you can poll on the latch to wait on it to be set before continuing.

self.driver.find_element_by_id("searchInput").send_keys("Tom Dale")
        
self.wait_until(lambda: self.driver.execute_script("return window._AUTOMATION_LATCH;") == True)
        
# Then verify only tom dale is seen.
results = self.driver.find_elements_by_tag_name("li")
self.assertTrue( "Tom Dale" in results[0].text )

This is good for waiting on items that are manipulated by a complex set of asynchonous JavaScript.  The main advantage to this technique is you can easily daisy change this to the promises your JavaScript developers are already using to perform their async actions.

Moving your actions into JavaScript injection

This technique is good for situations when elements are rapidly being refreshed on the page.  By pushing your actions into the JavaScript side, you can execute your find and your action in the same context as the page, thus making it a synchronous call.

self.driver.execute_script("$(\"li:contains('Einstein')\").click()")

In this technique, we combine both the selection and the action into one synchronous JavaScript call (using jquery).  The reason why this is more reliable than doing on the python end like this,

self.driver.find_element_by_xpath("//li[contains(.,'Albert Einstein')]").click()
Is that in reality, the selection and the click action will actually be sent as 2 separate calls when it goes over the wire on Selenium's JSON wire protocol.  Doing this all in JavaScript will ensure the call gets executed in the same frame.

Getting your tests to stable

If you want to learn more about these techniques or see them in action.  I created a sample project demonstrating some of the techniques.  Feel free to fork this project and contribute code samples of your own on how to deal with Stale Element problems.

Thursday, July 18, 2013

Fun way of labeling segments on video recordings on Sauce

I've been using SauceLabs for running my tests on different browsers.  However, it's very hard to debug tests on browsers I don't have installed, and with so many tests running that's reusing the same browser instances when possible to reduce start-up times.  I get very long video recordings with no breaks in between and no idea which segments corresponds to which tests.

Clapper Boards

In the movie industry, how they keep track of which segments and clips relate to which assets, they use a simple clapper board so the directors and producers can figure out where to clip the film and tag their clips.


Implementing one in Selenium

Doing the same with a selenium test is pretty simple with a little JavaScript.  You can simply create an element on the dom, apply a URI encoded image as a background, and set some text with styling over it.  Then after a short delay, just remove the element from the dom.


When you run a selenium test, you can start off with a simple call to the clapper board function, and you'll get a nice clapper board image that you can use to separate you selenium video recording clips.


Voila! Now you can find which clips correspond to which tests in a sea of recorded video footage.


Thursday, July 4, 2013

Setting up Open CI with Selenium for your open source project

Lately I've been setting up a CI process for my open source project WTFramework.  The idea of setting up a CI process has several benefits.  For one it helps provide an initial safety net for bad commits, and secondly it gives other people confidence in your code.

You can find the CI setup for the WTFramework here,
https://travis-ci.org/wiredrive/wtframework
and the build plans here,
https://github.com/wiredrive/wtframework/blob/develop/.travis.yml


I'll outlined the steps I took to setting up a simple CI process using Travis-CI and SauceLabs to run tests upon code check in to GitHub.  The WTF project is running a blend of unit tests, and a few selenium tests where the tests interact with the web browser.

Step 1 : Make your open source project publicly available on GitHub

For this article I'll be using github.  Since Travis-CI integrates deeply with GitHub, you'll want to host your project on GitHub if you want to use Travis-CI.  Also, SauceLabs' open source account will require a public repo in order to qualify for the account.

I'd recommend setting up at least 2 branches using the git-flow model .

  1. A 'master' branch that'll track your public releases.
  2. A 'develop' branch to use as your main integration point. 
You can use other branching models.  But this is what I feel works best with this work flow since it has a clear procedure to the direction of your merges.


Step 2 : Sign up for a SauceLabs open source account

As of this writing, SauceLabs, offers a free account for open source projects (with limited concurrent instances).  This is great for open source projects needing to run Selenium tests.

https://saucelabs.com/opensource

This process can take a few days to complete as there is a review process SauceLabs does before creating your open source account.  Once you get your account, spend some time getting to know SauceLabs if you haven't already.


Step 3 : Figure out how to run your tests using the command line on a unix system

The first step is figuring out how to setup your test environment from a fresh Travis-CI node.  I'd recommend going to the Travis website, then looking at the guide for your specific language as a starting point.

http://about.travis-ci.org/docs/user/ci-environment/

You'll want to take the approach of figuring out what travis has out of the box for that particular language, then figuring a managed way of deploying your dependencies.  Since WTF is a python project, using 'pip' and 'requirements.txt' file was a natural choice.

Here's sort of the basic commands for running WTF unit tests from the command line:
echo "setting up test environment" pip install -r requirements.txt --use-mirrors echo "setup environment variable for selenium grid in environment variable" export WTF_selenium_remote_url=http://sauceuser@yoursecretapikey:@ondemand.saucelabs.com:80/wd/hub echo "running unit tests" nosetests wtframework/wtf/tests/ nosetests wtframework/wtf/data/tests/ nosetests wtframework/wtf/testobjects/tests/ nosetests wtframework/wtf/utils/tests/ echo "running selenium tests" nosetests wtframework/wtf/web/tests/
These will used to build our travis config file for which commands to run during install and execution.

Step 4 : Setup your tests to pull the SauceLabs settings from Environment Variables

Note that secret configuration variables are passed via an environment variable.  You'll want to refactor your tests to read settings form an environment variable if they are sensitive, because you'll be passing them in encrypted instead of putting it inside your build or config files.  In this case, I'm passing the SauceLab's grid URL with the secret API key through the environment variable.

In the WTF framework, we do have a convenient way of referencing config variables.  But in absence of a config layer, you can just replace all your creation of Selenium Webdriver with:

caps = webdriver.DesiredCapabilities.FIREFOX
caps['platform'] = "Windows 8"
caps['version'] = "10"
selenium_grid_url = os.getenv('selenium_remote_url)

driver = webdriver.Remote(
            desired_capabilities = desired_capabilities,
            command_executor = selenium_grid_url
        )

For now I'm keeping it unencrypted for the sake of making it easier to debug while getting the project up.  But later I we'll encrypt the environment variable later.

Step 5 : Setup a Travis-CI project

Goto http://travis-ci.org, then login with your GitHub account.  Click on your profile picture to open your Travis-CI profile.  Then find your GitHub project and switch it to the 'ON' position to enable it.


Next, you'll want to create a '.travis.yaml' file.  Go back and read the Travic-CI guides to find how to configure your '.travis.yaml' file.

http://about.travis-ci.org/docs/user/build-configuration/

You'll have a '.travis.yaml' file like below:

---
# Put the command line commands you'll be running for your test.
# Here I have a simple nosetest2 unittest excluding tests I've tagged 
# not to run on CI.
script:
- nosetests-2.7 wtframework/wtf/tests/ -a !noci
- nosetests-2.7 wtframework/wtf/data/tests/ -a !noci
- nosetests-2.7 wtframework/wtf/testobjects/tests/ -a !noci
- nosetests-2.7 wtframework/wtf/utils/tests/ -a !noci
- nosetests-2.7 wtframework/wtf/web/tests/ -a !noci

# Set your language 
language: python
python:
- "2.7"
# Set your command for managing dependencies
install: pip install -r requirements.txt --use-mirrors


# Set your environment variables, like the sauce labs config.
env:  selenium_remote_url=http://sauceuser@yoursecretapikey:@ondemand.saucelabs.com:80/wd/hub


Make sure for any secret value you want to pass to travis (api keys, passwords, etc.), you'll need to rework your project to read them from an environment variable.  They will be temporarily out in the open while you troubleshoot your script, we'll revoke, generate new ones,  and encrypt them later after we get the project working.

After you added the '.travis.yaml' file to your project's root folder.  Push it to GitHub.  After you push your changes, Travis-CI will queue your project to be run.  When it starts running, you can visit your project page at on travis,  https://travis-ci.org/githubaccount/projectname, and you'll see a yellow ball indicate it's running, and the shell output below.


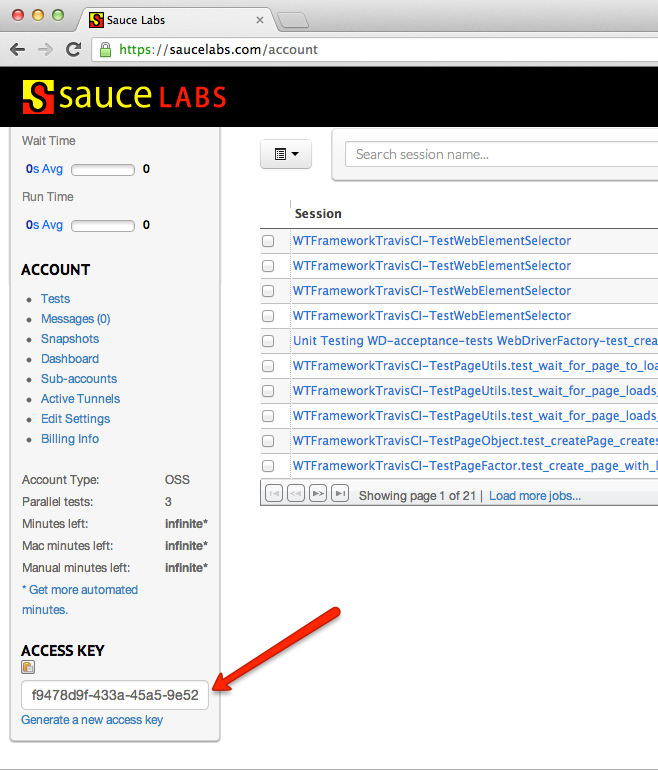
While you're tests are running, log in to the SauceLabs Account, and see check if your tests run.  Under  tests, you'll see some automated testing sessions spawned up.  You can also view a video stream of the selenium node, and a video recording after the test has completed.


Step 6 : Encrypt your Environment Variables

Now that you have your project fully running.  The last step is to hide all your sensitive information you've extracted out into the environment variables, like the SauceLabs api key, and any other api keys or passwords you have created.  Travis on instructions on how to do this here,

http://about.travis-ci.org/docs/user/encryption-keys/

You'll want to first have Ruby installed if you haven't already.  Best way to install Ruby is to use RVM (Ruby Version Manager), https://rvm.io/

After you have ruby install you can install the travis gem.

bash-3.2$ sudo gem install travis
Successfully installed travis-1.2.3
1 gem installed
Installing ri documentation for travis-1.2.3...
Installing RDoc documentation for travis-1.2.3...
bash-3.2$
After the Travis' Ruby Gem is installed.  You can start encrypting your keys.  First revoke your old keys and change the passwords used.  In SauceLabs, you can find this functionality at the bottom left of your account homepage.


With your new API key generated, we can now encrypt it.  You can do this using the 'travis encrypt' command, with the '--add' flag to automatically insert it into your travis config.  You can also exclude the '--add' flag if you want to view the encrypted output and manually insert it yourself.

bash-3.2$ travis encrypt WTF_selenium_remote_url=your_secret_sauce_api_key --add
/Library/Ruby/Gems/1.8/gems/faraday-0.8.7/lib/faraday/adapter/net_http.rb:23: warning: already initialized constant NET_HTTP_EXCEPTIONS
bash-3.2$
Go back and edit your ".travis.yaml" file.  Remove your old keys that you've replaced with a secure one.  Your config file should now look similar to below.  Note the old 'env:' section is not replaced by 'secure' globals with encrypted values.

install: pip install -r requirements.txt --use-mirrors
env:
  global:
    secure: |-
      azb2aXWuGWsymxeXGkUER@4*SQ58kJ+bx1MamEYYf5XcoDyW2R8fn/8q1H
      JcPK/EB0F8gBrvthE/f@dWNQmV0yHmiTkAbF6tPMC2XCW5HlH38raFZ6eCE
      hyLNfQpF+MEKTXPs+mcptF/1y3KuUGjPu60dgfyDxCzro+FKPpw=
python:
- "2.7"
language: python
script:
- nosetests-2.7 wtframework/wtf/tests/ -a !noci
- nosetests-2.7 wtframework/wtf/data/tests/ -a !noci
- nosetests-2.7 wtframework/wtf/testobjects/tests/ -a !noci
- nosetests-2.7 wtframework/wtf/utils/tests/ -a !noci
- nosetests-2.7 wtframework/wtf/web/tests/ -a !noci

At this point, all you have to do is push your changes and watch it run again to verify you have things working.

References

Wednesday, June 26, 2013

Thoughts on the 2013 Selenium Conference


Recently got back from the Selenium Conference in Boston.  I felt it was very informative.  In terms of talks, the quality of the talks seem much higher than Star West, I feel there's more tuned for a automated test developer than theoretical test management.

But there seems to be a dichotomy of inspirational/aspirational and things that can be very practical   For example, companies like Facebook, Google, and Salesforce talked a lot about their cool home grown CI systems backed by massive cloud infrastructure with all the cool goodies.  But from a small company's perspective where we only have 2-3 QA in the entire company, and 2 Dev Ops that support our entire operations, I sort of feel left out as it'll be too much of a maintenance burden to take all that on.

There are some good take aways.  Some things I thought were interesting were the Selenium Grid Extras that was open sourced by Groupon, https://github.com/groupon/Selenium-Grid-Extras, I think it's an interesting idea of having a plugin system for Selenium grid which you can then use to better manage the tests running on the nodes, and the nodes themselves.  I have this on the backburner of things to look into.

Another talk I really like was the MediaWiki (aka: Wikipedia) who have their entire CI/Test Automation setup open sourced and completely transparent.  From their VMs for testing, https://www.mediawiki.org/wiki/MediaWiki-Vagrant, to their code review system, https://gerrit.wikimedia.org, to their CI builds, https://integration.mediawiki.org/ci/.  I see this as a open hand book of one working test automation / CI setup I can look to for implementation details or inspiration.

If you missed the conference, you can view all the video footage here:  http://www.youtube.com/seleniumconf


Tuesday, April 9, 2013

Using Jquery to find WebElements

One of the interesting things I've discovered using the Selenium Webdriver's 'execute_script()' method is anytime you execute code that returns a WebElement node, it automatically gets converted to a Selenium WebElement. Try the following code snippet using the python interactive shell.
david$ python
Python 2.7.2 (default, Oct 11 2012, 20:14:37)
[GCC 4.2.1 Compatible Apple Clang 4.0 (tags/Apple/clang-418.0.60)] on darwin
Type "help", "copyright", "credits" or "license" for more information.
>>> from selenium import webdriver
>>> driver = webdriver.Firefox()
>>> driver.get("http://www.google.com")
>>> input_field = driver.execute_script("return document.getElementById('gbqfq');")
>>> type(input_field)
<class 'selenium.webdriver.remote.webelement.WebElement'>

>>> input_field.send_keys("hello world")
>>>
 Notice that when I called execute script that returns and HTML DOM element, it automatically gets wrapped in a selenium WebElement object, which we can treat as a webelement.

Because of this, we can do some interesting tricks, one of which is using JQuery's APIs for searching for a target webelement.  We can write a simple function that injects jQuery into any target webpage given a webdriver, then will execute a jquery call and return the result.  The trick here is to return [0], which will get you a reference directly to the underlying DOM node.


def find_by_jquery(driver, jquery_selector):
    """Injects JQuery into the page.  This will allow the page to accept jquery javascript
    commands for automating some of the items selenium may have troubles with.
    @param webdriver_or_page_object: Selenium webdriver or a WTF PageObject."""
    jquery = open('jquery.min.js').read()
    webdriver.execute_script(jquery)
    javascript = "return $(\"{0}\")[0]".format(jquery_selector)
    return driver.execute_script(javascript)

Now we can do some interesting selection using jQuery's powerful selection criteria.  For example, say I want to get a reference to a deeply buried webelement.  Like the PE ratio from Yahoo's stock quote page.  This would normally require a complicated xpath that will likely break on IE or Safari, but using jquery, we have a simple elegant selector that's simply finds the text we're looking for, then look at the next sibling of the desired type.
driver = webdriver.Firefox()
driver.get("http://finance.yahoo.com/q?s=GOOG%2C+&ql=1")
PE_cell = find_by_jquery(driver, "th:contains('P/E')~td")
print "The PE is: ", PE_cell.text
This is also very useful for shops who develop their script in jQuery.  If the developers are using jquery to find all their elements, then this allows on the automation end to leverage the same selectors the devs are using.  This technique can also be adapted to work with other JS frameworks.


Thursday, February 7, 2013

WTF is now open source!

I'm happy to announce that Web Test Framework, WTF, is now open source.  You can find the source and installation instructions here:

https://github.com/wiredrive/wtframework

I've taken a lot of product agnostic framework code I've been working on the last couple months and separated it out from  our test scripts into a reusable framework.  I hope that by doing this, we could take web testing into a structured approach with easy to use generators and integrated tools like how various MVC frameworks like Rails and Django have revolutionized web development.

Please check it out and let me know what you think.  I'll be working on trying to get this framework documented and making it more user friendly.


Monday, December 31, 2012

Python : Quick and Dirty PageObject Pattern

One of the basic of good test automation design is to keep low level actions separate from high level business rules.  One way of doing this is keeping a consistent theme of separating screens, windows, and dialogs into manageable self contained objects that hide all the low level UI interactions and only expose higher level transactional actions.

While Java has an official PageFactory implementation.  Those of us using Python are left trying to figure out what works best out of the the many implementations out there.   Here are a few implementations I find notable.
However,  I wanted something slightly different.  1st example I thought was a bit annoying to have to create wrappers for all the page elements, while the 2nd one was trying to implement a test framework (something which I already have).  The 3rd I felt was not a very good way of implementing Page Objects due to having hard coded locators in the method bodies and not enforcing page validation.

So I started thinking of how I'd implement one that was very simple, light weight and easy to understand.  I want to make one that was easy to maintain, debug, and have a very elegant syntax during usage.

Creating a quick and dirty Page Object Base Class

At the very essence, I need the Page Object to do the following:
  1. Validate we are on the correct page.
  2. Keep track of it's elements in 1 centralized place in the Page Object class (all in the top section)
  3. Hide UI level logic and only expose transactional level interactions.

Handling Page Self Validation

To handle the aspect of making pages self validating, we can accomplish this using a simple base class with an abstract method for validating the page.  Then in our PageObject constructor we can make a call to validate the page when the constructor/initializer is called.


import abc

class PageObject(object):

    # Webdriver associated with this instance of the PageObject
    webdriver = None

    def __init__(self, webdriver):
        self._validate_page(webdriver)
        
        self.webdriver = webdriver

    @abc.abstractmethod
    def _validate_page(self, webdriver):
        """
        Perform checks to validate this page is the correct target page.
        
        @raise IncorrectPageException: Raised when we try to assign the wrong page 
        to this page object.
        """
        return

class InvalidPageError(Exception):
    '''Thrown when we have tried to instantiate the incorrect page to a PageObject.'''

Now classes that inherit from PageObject will enforce PageValidation.  In this base PageObject class, we also assign the WebDriver instance, which will be useful for the next step below.

Handling Page Element Mapping


To keep all the Page Element Mappings in one place, I want to accomplish this by making all page element mappings a Class property that's evaluated during run time.  There's 2 ways we can effectively do this in Python, 1) Using class decorators to simplify writing getter methods, or 2) Using Python's lambda expressions to create easy 1 line anonymous functions that are called at run time.  I felt the 2nd was a lot less work to do, so I opted for the latter.  As you can see below, using the lambda functions I'm able to effectively keep all my locators in 1 place in my PageObject class, where they're all in one place and easy to maintain.


class ProjectHomePage(PageObject):
    '''
    Page Object for Project Home Page (page when you view an individual project)
    '''

    # Identifying Properties #
    _BODY_TAG_ID = "project_home"

    ### Web Element Identifiers ###
    to = lambda self:self.webdriver.find_element_by_css_selector("#send-presentation-overlay .to-textarea")
    subject = lambda self:self.webdriver.find_element_by_xpath("//*[@id='send-presentation-overlay']//input[@name='subject']")
    message_text = lambda self:self.webdriver.find_element_by_css_selector("#send-presentation-overlay .message-textarea")
    send_button = lambda self:self.webdriver.find_element_by_css_selector("#send-presentation-overlay .submit")
...
    def send_message(self, to_address, subject, message):

        self.to().send_keys(to_address)
        self.subject().send_keys(subject)
        
        #switch message input to text input to make it easier to set the message.
        self.message_text().send_keys(message)

With the mapping handled by lambda expression, how you can use this lambda expression to referencing the mappings by calling it as a member method. These lambda expressions are handled during runtime and will return the webelement requested using the stored instance of WebDriver from the base PageObject.

Another added benefit of using lambda expressions is it works very well with WebDriverWait statements.  This is very useful for Ajax pages where you are frequently waiting for elements be become visible/enabled. (Note: this is a bit hackish in how I pass in 'self' instead of the webdriver in the webdriver wait. But the end result is the same, the lambda function has a direct reference to the webdriver through the '.webdriver' property.)


WebDriverWait(self, 10).until(self.send_button).click()

How it comes together to hide low level details

Once you have a bunch of these low level transactional details wrapped into PageObject calls.  Writing your high level tests should be a simple matter of just calling your PageObject's methods.  This will automatically do the page validation and perform the actions.


class TestProjectPageTests(unittest.TestCase):
    
    def test_send_message_to_project_manager(self):
        driver = firefox.webdriver.WebDriver()
        LoginPage.go_to_page(driver)
        LoginPage(driver).login("user","password")
        HomePage(driver).go_to_project_page()
        ProjectsListPage(driver).open_project("Project1")
        ProjectPage(driver).send_message_to_project_manager("test message")
        ...

There you have it.  A simple PageObject implementation that not that hard to implement, and does wonders for cleaning up your high level test syntax.


Update:

Since I've written this article a while back.  I've put a lot of this implementation into Web Test Framework (WTF), which my company has open sourced.  You can find WTF, here:  https://github.com/wiredrive/wtframework

Friday, December 28, 2012

Python Selenium - Capturing ScreenShot on Error

As part of the test framework, at the point of error, we'd like to capture as much information as possible, including taking screenshots. In order to do this using a Python Unittest / Selenium framework we did 2 things.  1) Create a screenshot utility function that can work both across a local or remote webdriver. 2) Create a base test where we modified the run method to take a screenshot prior to saving the error message, and

Creating our screen capture utility function

Selenium webdriver offers a couple methods for capturing screenshot.  One works well for local instances of webdriver, and the other while much slower is better to use for RemoteWebDriver as binary data can be unpredictable across scripting over the wire.


class ScreenShotUtil:
    "Screenshot Utility Class"

    @staticmethod
    def take_screenshot(webdriver, file_name="error.png"):
        """
        @param webdriver: WebDriver.
        @type webdriver: WebDriver
        @param file_name: Name to label this screenshot.
        @type file_name: str 
        """
        if isinstance(webdriver, remote.webdriver.WebDriver):
            # Get Screenshot over the wire as base64
            base64_data = webdriver.get_screenshot_as_base64()
            screenshot_data = base64.decodestring(base64_data)
            screenshot_file = open(filename, "w")
            screenshot_file.write(screenshot_data)
            screenshot_file.close()
        else:
            webdriver.save_screenshot(filename)

Adding our screenshot capture rule

In Java's JUnit, you can easily just create a MethodRule (or TestWatcher) which you can use to annotate your tests.  Because Python's UnitTest does not have such a feature to register call backs or event listeners to failed test results, short of implementing or using a 3rd party Test Runner, an easy way to do this is to just create a BaseTest where we override the 'run' method and insert these calls.  To do this,

  1. Open the source code for unittest.TestCase.  You can find it here, http://sourceforge.net/projects/pyunit/
  2. Create a BaseTest class that extends TestCase.
  3. Override the run() method definition with the copy from the latest version.
  4. Inside the exception hander for failed step, and error step, insert your call to your screen capture utility.


...
class ScreenCaptureTestCase(unittest.TestCase):
...
    # Defining an init method so we can pass it a webdriver.
    def __init__(self, methodName='runTest', webdriver=None, screenshot_util=None):
        super(WDBaseTest, self).__init__(methodName)
        
        if webdriver_provider == None:
            self._webdriver = WebDriverSingleton.get_instance()
        else:
            self._webdriver = webdriver

        if screenshot_util == None:
            self._screenshot_util = WebScreenShotUtil
        else:
            self._screenshot_util = screenshot_util 
    ...
def run(self, result=None):
        """
        Overriding the run() method to insert our screenshot handler.
        
        Most of this method is a copy of the TestCase.run() method source.
        """
        orig_result = result
        if result is None:
            result = self.defaultTestResult()
            startTestRun = getattr(result, 'startTestRun', None)
            if startTestRun is not None:
                startTestRun()
            ... more pyunit code ...
                except self.failureException:
                    # Insert our Take Screenshot on test failure code.
                    fname = str(self).replace("(", "").replace(")", "").replace(" ", "_")
                    fmt='%y-%m-%d_%H.%M.%S_.PNG'
                    filename = datetime.datetime.now().strftime(fmt)
                    self._screenshot_util.take_screenshot(self._webdriver, filename)
                    result.addFailure(self, sys.exc_info())
            ... more pyunit code...
                except:
                    # Do the same thing again for errors.
                    fname = str(self).replace("(", "").replace(")", "").replace(" ", "_")
                    fmt='%y-%m-%d_%H.%M.%S_.PNG'
                    filename = datetime.datetime.now().strftime(fmt)
                    self._screenshot_util.take_screenshot(self._webdriver, filename)
                    result.addError(self, sys.exc_info())
            ... more pyunit code ...

...


Now that I have inserted calls to 'take_screenshot' into the try/except blocks that handle test errors, we now will capture screenshot whenever a test extending this test fails. You can use this test case like this:

import unittest
from wtframework.wtf.testobjects.basetests import WTFBaseTest
from wtframework.wtf.web.webdriver import WTF_WEBDRIVER_MANAGER


class TestScreenCaptureOnFail(ScreenCaptureTestCase):
    """"
    These test cases are expected to fail.  They are here to test 
    the screen capture on failure.
    """

    # Comment out decorator to manually test the screen capture.
    @unittest.expectedFailure
    def test_fail(self):
        driver = WTF_WEBDRIVER_MANAGER.new_driver()
        driver.get('http://www.google.com')
        self.fail()
        #Check your /screenshots folder for a screenshot.

There you go, we have a simple method that automatically captures screenshots upon test failure.


Update: 
I have since then incorporated this into WTFramework,
https://github.com/wiredrive/wtframework

In WTFramework, I extended the basic TestCase class to WatchedTestCase, which allows you to register listeners.
https://github.com/wiredrive/wtframework/blob/master/wtframework/wtf/testobjects/testcase.py

This then allows me to register various listeners like my CaptureScreenShotOnErrorTestWatcher
https://github.com/wiredrive/wtframework/blob/master/wtframework/wtf/testobjects/basetests.py


Saturday, December 22, 2012

PythonProject - Creating a Config Reader

One of the keys of good test framework design is creating a good system of managing configurations.  This allows your automated tests to be easily configurable to run on any environment against any target system.  If I want to run a test locally, I should be able to feed it a config file from my system and run the test against a local or QA instance, a Continuous Integration system should be able to feed it the config of the integration server and run it in CI.

USING THE OS ENVIRONMENT VARIABLES TO SPECIFY CONFIG FILES

Theres 3 ways you can basically 2 ways you can pass it config files.  As a run time parameter, an environment variable, or through some sort of scripting that copies the file into a hard coded location.  I decided to opt for the environment variable route.  This is easier for me to work with in my own dev environment as I can just type use a "export TEST_CONFIGS different_env.config" when I want to change config files without having to edit my build or shell scripts.

Another thing I thought might be nice is the ability to load multiple configs so I can split my settings across different config files.  For example, I can load the default configs that contain QA server settings by default.  But when I want to run the test across IT or Live, I can load those configs on top of the default settings so I overwrite the settings where applicable.

import os
...
        try:
            if(os.environ["TEST_CONFIGS"] == None):
                raise Exception("No Config Specified, using defaults.")
            else:
                # Read and load in all configs specified in reverse order
                configs = re.split(",|;", str(os.environ["TEST_CONFIGS"]))
                    self.__load_config_file(config)
        except:
            #Fall back to default.yaml file when no config settings are specified.
            self.__load_config_file(ConfigReader.DEFAULT_CONFIG_FILE_LOCATION)       
...


INTRODUCING YAML

Since our company is already using YAML for most of it's configurations anyways, I decided to also use YAML as the way of managing my configs.  The goal will be eventually I should be able to feed it config files from the server deployment along side to handle all the test environment references such as database connections and server base urls, then all I'll need to supply is an additional yaml files for managing test accounts, framework settings, and selenium configurations.

Implementing a config using YAML is pretty simple using PyYAML.  Using their classes, you can easily parse YAML files into a simple dictionary.
       
 import yaml
 ...
 config_yaml = open(config_file_location, 'r')  
 dataMap = yaml.load(config_yaml)  
 config_yaml.close()  
 ...  

IMPLEMENTING A NAME SPACED WAY OF ACCESSING CONFIGS

Since it would be annoying to have to type a bunch of quotes when accessing the python dictionary objects. "config_settings['selenium']['browser']['desiredcapabilities']".  I thought it be easier if I can reference settings in a name spaced way, "config.get("selenium.browser.desiredcapabilities"), especially for multilevel configs.  This can be easily done using split and a 'for' loop.


 ...
        def get_value(self,key):
        
            try:
                if "." in key:
                    #this is a multi levl string
                    namespaces = key.split(".")
                    temp_var = data_map
                    for name in namespaces:
                        temp_var = temp_var[name]
                    return temp_var
                else:
                    value = data_map[key]
                    return value                
            except (AttributeError, TypeError, KeyError):
                raise KeyError("Key '{0}' does not exist".format(key))
 ...  

While you're at it, it's a good idea to define a get_value method that returns a default when unavailable.


    def get_value_or_default(self,key, default):
        try:
            return self.get_value(key)
        except KeyError:
            return default

Wednesday, December 12, 2012

Upcoming Project : Python Web Testing Framework

It's been a while since I written a post, in fact I switched jobs twice since the last time I wrote.  While my last job was mainly focused on getting manual testing process up to speed, which didn't allow me to do as much in test automation.  Now that I've changed jobs to a company that has a good amount of continuous integration in place and a more stable product, I can go back to focusing on the more automated side of things.

One of the cool things I get to work on, which I'm very excited about, is creating an Acceptance Testing Framework (ATF) to better organize and manage our automated end to end tests.  I'll be building one using using various open source pieces.  I already have many ideas I'm very excited about.  As I implement the various pieces, I'll write some short articles explaining the philosophy and the technical high level design of the pieces I'm implementing as I implement them.

Some of the items I'm thinking of currently (things may change as I start to design and implement the framework):

I'll have more info to come in the future.  I'm still in the conception and planning stages.  Please send me any feedback with any ideas you may have.